Welcome to the forums at seaphages.org. Please feel free to ask any questions related to the SEA-PHAGES program. Any logged-in user may post new topics and reply to existing topics. If you'd like to see a new forum created, please contact us using our form or email us at info@seaphages.org.
Recent Activity
All posts created by DanRussell
| Link to this post | posted 27 Jan, 2022 18:33 | |
|---|---|

|
Hi all, Christina Spencer from LeTourneau wanted to share a fix for the follow error she encountered helping students set up VirtualBox on Macs to install DNA Master. If you try to launch your new VM and get this error (kernel driver not installed): 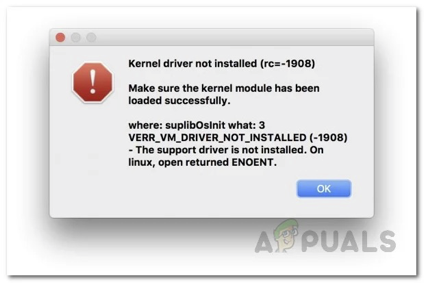 You can follow the steps at this website: https://appuals.com/kernal-driver-not-installed-rc-1908-error-mac/ The subsection “Allow Oracle Certificate through System Preferences” has step-by-step instructions that can be followed. This error is caused by your Mac not approving the program to run and you need to give the program permission. Follow your system prompts about giving permissions to the VirtualBox/Windows if prompted to proceed with next steps. Thanks, Christina! –Dan |
Posted in: DNA Master → VirtualBox error: Kernel driver not installed
| Link to this post | posted 10 Jan, 2022 20:22 | |
|---|---|
|
|
I would try increasing the base memory for the VM to like 4096 Mb or even higher. 2 Gb (your current setting) is quite low for Windows to be able to run, so increasing that should help. It won't necessarily use all the memory you allocate, but it's better to be higher. I also have 16 Gb on my Mac, and my Windows 10 VM has 6140 Mb of memory allocated. –Dan |
Posted in: DNA Master → DNA Master and Windows 10
| Link to this post | posted 10 Jan, 2022 16:56 | |
|---|---|
|
|
Hey Nancy, Not sure, but it sounds like your computer might be struggling to run the virtual Windows. What's the base RAM of your Mac computer? And how much memory and video memory did you allocate to the Windows VM? –Dan |
Posted in: DNA Master → DNA Master and Windows 10
| Link to this post | posted 17 Dec, 2021 19:30 | |
|---|---|
|
|
mary.preuss For future folks: Mary and I did some troubleshooting offline, and it turned out it was the folder name she'd installed DNA Master into that was giving her issues. She installed DNA Master into a folder that had an apostrophe in its name, like "Mary's Stuff", and that apostrophe was confusing DNA Master's ability to correctly locate directories and save files. So don't use any unusual characters in the names of your filesystem, stick to letters and numbers only! I've updated the DNA Master installation instructions to reflect this. –Dan |
Posted in: DNA Master → TbQueries
| Link to this post | posted 17 Nov, 2021 16:24 | |
|---|---|
|
|
Hi Kyle, Very interesting stuff! We have some Nanopore experience as well, but I'm pretty wary on its readiness to be a one-technology phage-sequencing option. In our most recent runs using a previously-sequenced (known) phage, single reads are around 89% accurate, but even high-coverage assemblies are still only around 98-99% accurate. Obviously, that means than 1 in every 50-100 bases would be wrong or gapped—even after lots of coverage—and that's not good enough to consider a phage "sequenced" or proceed with annotation. (Side note: many of the remaining errors were 1-2 base insertions/deletions, so they'd definitely throw a wrench in annotation.) That said, technologies improve over time, as does the software to make sense of their raw data. To really feel confident that an only-Nanopore-sequenced phage genome is reliable, we'd need to do several phages with known sequences and compare the Nano output to the reference. Chris actually did this with PacBio sequencing a bunch of years ago, and convinced me that when using the proper type of PacBio reads with enough coverage, you could trust a final sequence that came out of PacBio. You're right that, while Illumina-Nano hybrid assemblies have been great for bacterial sequencing, they're overkill for phages. Since almost all phages assemble fine with Illumina reads only, the Nanopore isn't necessary. But that doesn't mean it can't have a use in phage research or a SEA-PHAGES classroom. For example, it's probably economically feasible (and cool) for students to each get a little bit of Nanopore data for their phages, and then you could use that to decide which ones to send for Illumina sequencing, or add a Cluster to the phage's profile. We'll be talking about this stuff more at the next virtual faculty meeting! I think it's slated for Dec 17th, hopefully you'll be free. Quick question: which Nanopore library prep kit did you use for you phage sequencing? –Dan |
Posted in: Sequencing, Assembling, and Finishing Genomes → Nanopore
| Link to this post | posted 21 Sep, 2021 20:04 | |
|---|---|
|
|
Hi Steve, Jeffrey has made a couple of changes that should help:
The first will help with downloading the installer, while the second should make the first couple of updates work on most systems. That said, the usual caveats still apply: run as Admin, make sure preferences are correct, etc. Not sure why yours suddenly stopped working, but mine seems to be okay. –Dan |
Posted in: DNA Master → DNA master server down?
| Link to this post | posted 12 Aug, 2021 19:19 | |
|---|---|
|
|
byrumc@cofc.edu Hi Christine, We usually don't bother trimming the reads when doing phage assembly since it is usually fairly straightforward. So raw reads are totally fine. We do use skewer to trim reads for our bacterial assemblies, partly because those are often 300-base reads and have lower quality more frequently towards their ends. https://github.com/relipmoc/skewer –Dan |
Posted in: Newbler → Getting Started with Phage Assembly
| Link to this post | posted 15 Jul, 2021 14:25 | |
|---|---|
|
|
Hey Evan, You make a good case as to why this one merits a check as a potential sequencing error, and it has some of those red flags (different from similar genomes, breaks a gene). But I just checked the sequencing data and see this: 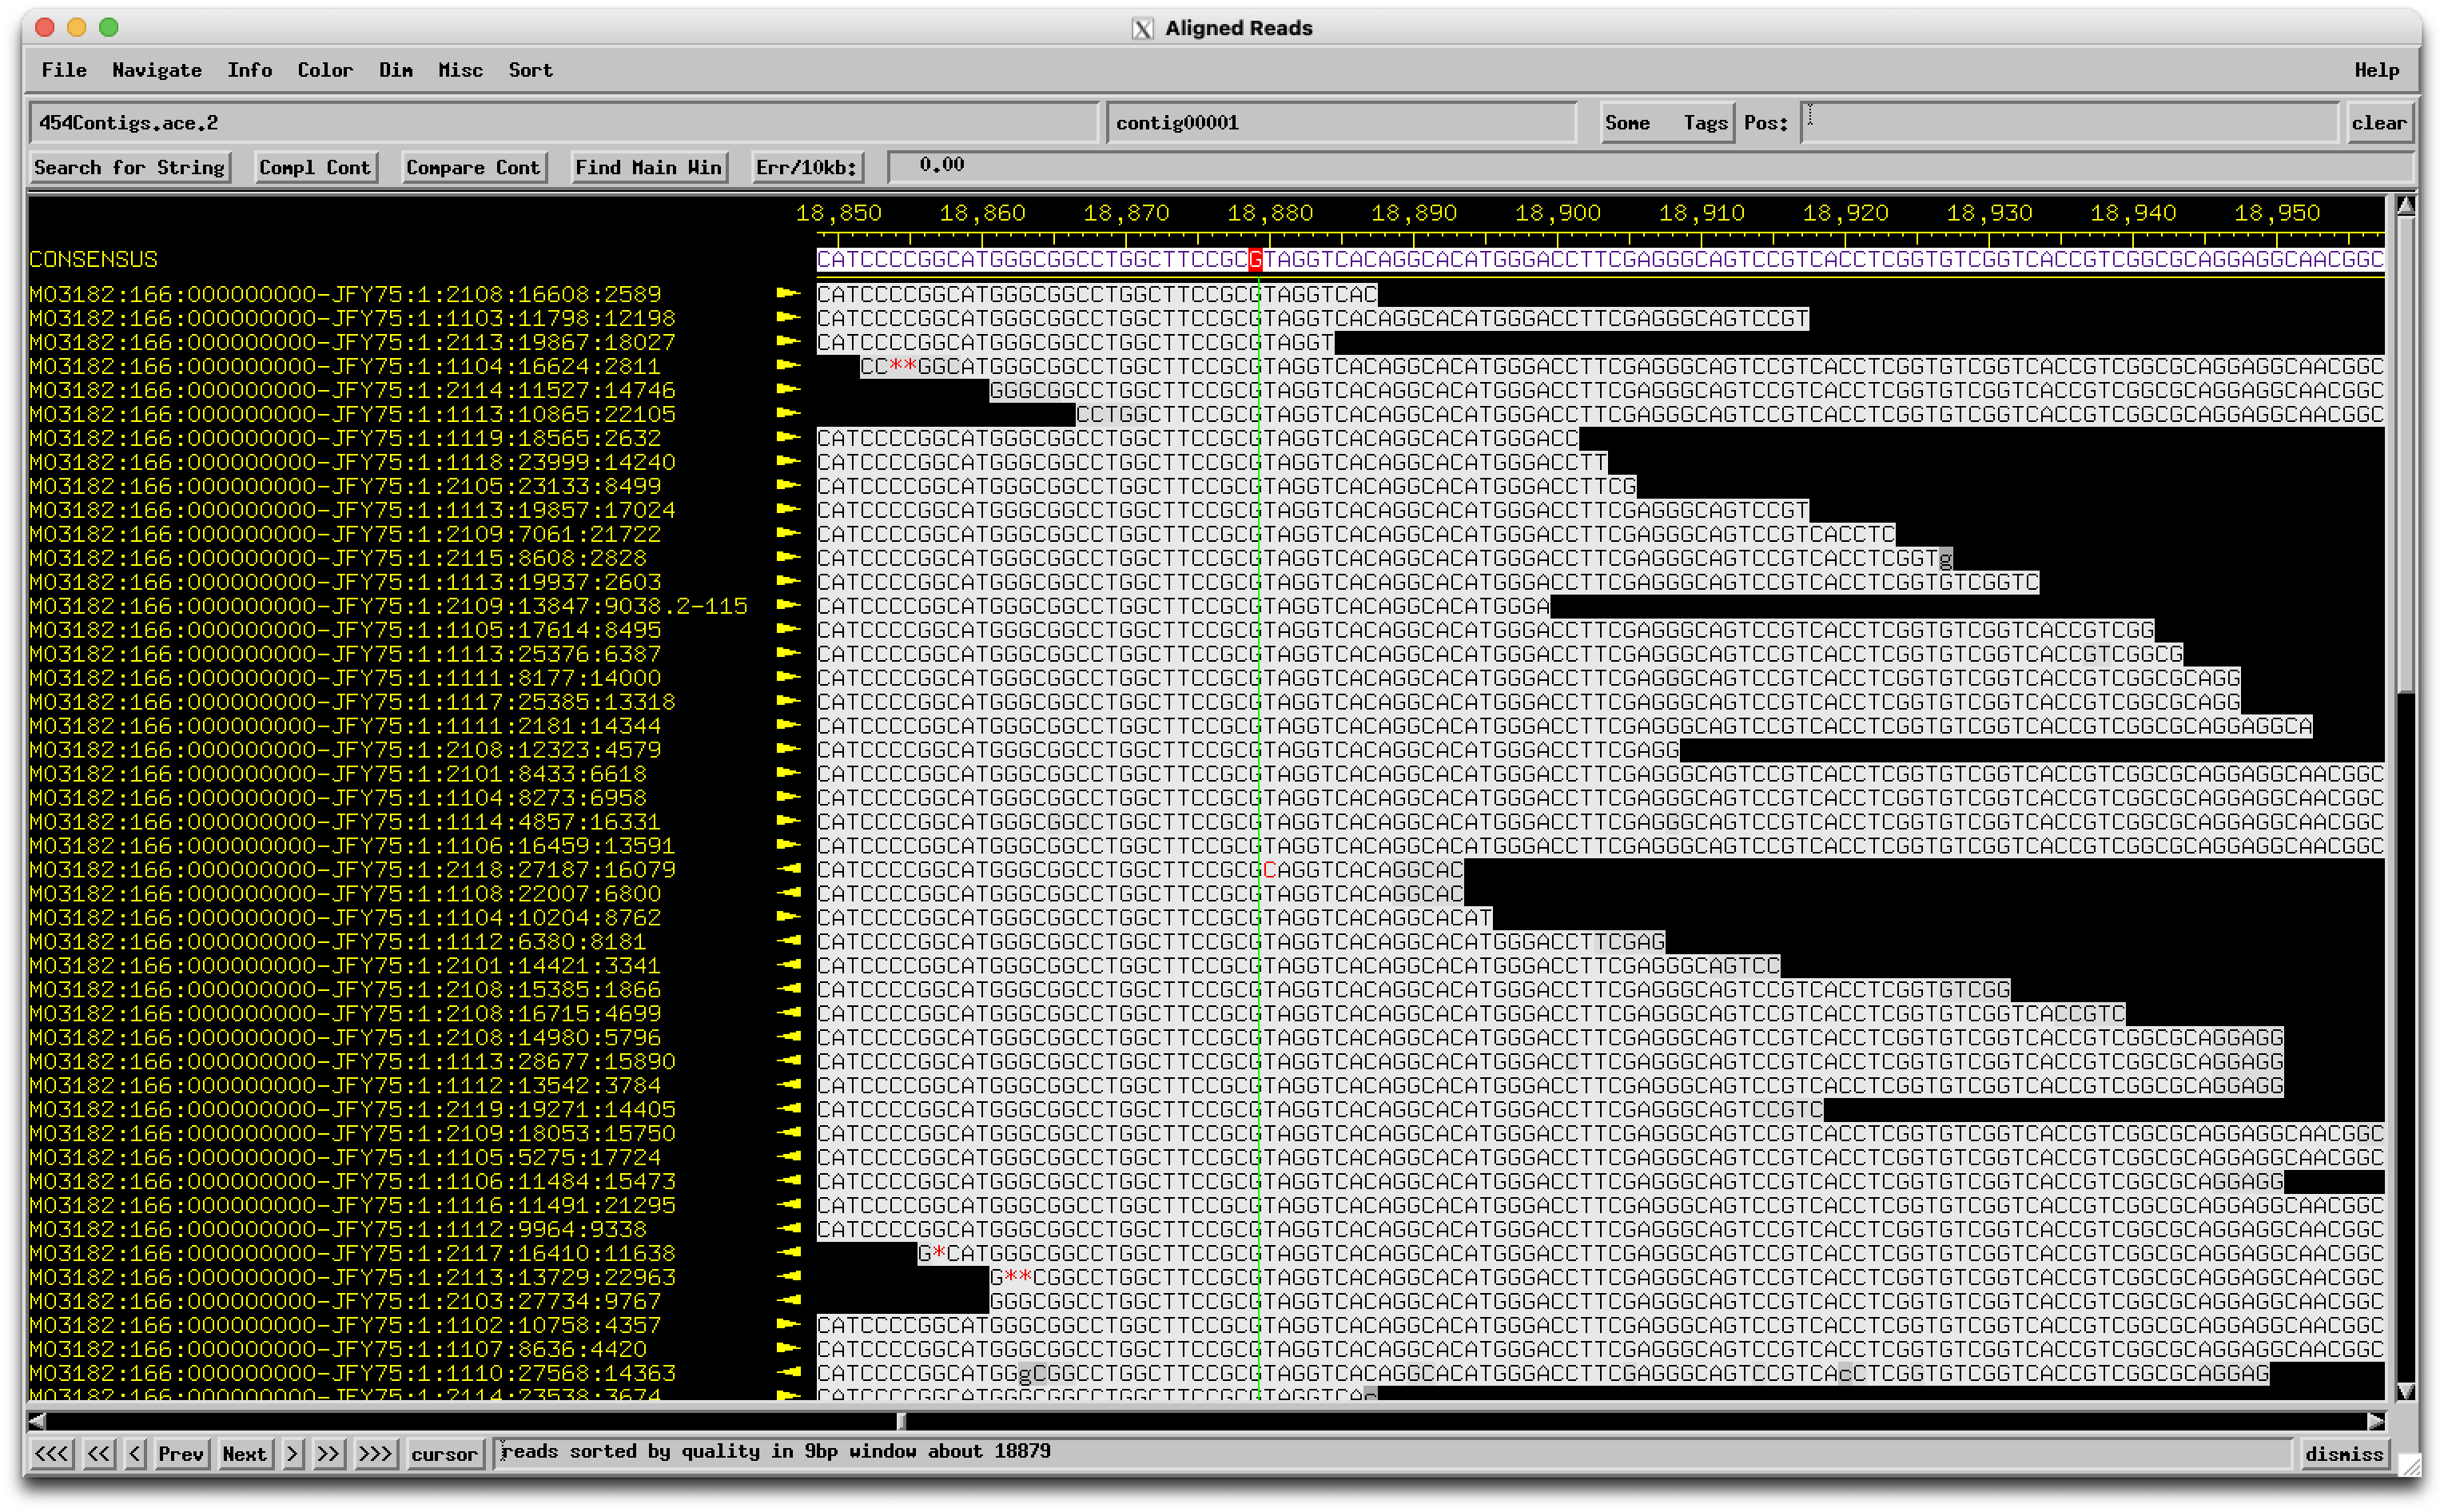 The base in question is a couple to the right of the green line, and the "A" called there is really strongly supported with no conflicting reads. So it's a real biological thing! –Dan |
Posted in: Annotation → Is this a sequencing error?
| Link to this post | posted 22 Jun, 2021 13:17 | |
|---|---|
|
|
Hi all, This is partly my fault! Since we switched to a new web-hosting company back during the winter break, I haven't managed to successfully update all of my updating scripts, and hence I've needed to update to each new Phamerator database manually and often been behind. But I just tried to update the Phamerator script on PhagesDB and make sure it's correct going forward, so hopefully there won't be major issues anymore. –Dan |
Posted in: Starterator → Pham not found in Starterator
| Link to this post | posted 25 May, 2021 16:54 | |
|---|---|
|
|
Hi Kathleen, Looks like that screenshot shows someone using a Windows VM within a Mac, so they can't use Chris or Debbie's procedures, which would be Mac-specific. Instead, they can follow the directions here to connect to an FTP site from Windows: https://www.howtogeek.com/272176/how-to-connect-to-ftp-servers-in-windows-without-extra-software/ Basically: 1. In Windows, open up a File Explorer window either using the Start Menu or clicking the little folder icon at the bottom of the screen. 2. In that File Explorer window, click on "This PC" on the left. 3. Right-click in the blank area called "Drives and Devices", and select "Add a network location" from the dropdown menu. 4. Then click "Choose a custom network location". 5. When it asks for an internet address, put "ftp://cobamide2.bio.pitt.edu/", then on the next screen make sure "Log in anonymously" is checked. 6. Complete the wizard with the open now option selected. 7. You should now see a folder open with the contents of that FTP site. Open the "DNAMas" folder, find the file "dna master.exe", and drag it to your desktop. Then you should be able to install! Much more complicated than it used to be, but hopefully this will work. –Dan |
Posted in: DNA Master → DNA master server down?