Welcome to the forums at seaphages.org. Please feel free to ask any questions related to the SEA-PHAGES program. Any logged-in user may post new topics and reply to existing topics. If you'd like to see a new forum created, please contact us using our form or email us at info@seaphages.org.
Recent Activity
All posts created by DanRussell
| Link to this post | posted 04 Apr, 2017 17:44 | |
|---|---|

|
Hi Nancy, These are probably tRNA genes, which don't appear in Phamerator (yet!). So for those you'll have to follow some of the tRNA guidelines rather than Starterator, Phamerator, etc. –Dan |
Posted in: Phamerator → Missing Genes in Phamerator Ading_draft
| Link to this post | posted 28 Mar, 2017 14:29 | |
|---|---|
|
|
Hi Victoria, If Phamerator ever prompts you for a password, it should just be: "phage". If that doesn't work, something else has gone wrong! –Dan |
| Link to this post | posted 02 Mar, 2017 20:27 | |
|---|---|
|
|
Hi Nikki, Glad it worked. Definitely shutting down the VM or closing your computer while Phamerator's running/doing things can cause problems. I'd always advise to close Phamerator before shutting anything else down. –Dan |
Posted in: Phamerator → Locked out of Phamerator
| Link to this post | posted 01 Mar, 2017 15:39 | |
|---|---|
|
|
Hi Nikki, Did you try "phage" for the password? If phamerator ever wants a password, that's the one. If that doesn't help, Steve recently answered a similar question via email, so I'm going to copy his response here: It sounds like one of two things: –Dan |
Posted in: Phamerator → Locked out of Phamerator
| Link to this post | posted 09 Feb, 2017 15:32 | |
|---|---|
|
|
Note that there's also a little document on using Inkscape with Phamerator maps that came out of the Faculty Retreat last year: http://seaphages.org/faculty/information/#modifications http://seaphages.org/media/docs/UsingInkscapeToEditPhameratorMaps.pdf –Dan |
Posted in: Phamerator → Printing phamerator maps
| Link to this post | posted 07 Feb, 2017 16:39 | |
|---|---|
|
|
Hi Joe, As for the BLASTing, you could try an intermediate approach between all-genes and one-at-a-time. Welkin made a video about how to BLAST a batch of genes in DNA Master, so you could try chunks of 10 for example. Batch BLASTing in DNA Master As to the E-value, those might just be a result of having a less-common cluster of phage this time around. If you had a new Singleton, you'd expect to see some genes with not-good BLAST hits. Cluster L3s are not that common (only 4 in GenBank, I believe), so it's totally possible that those are "new" genes. Check them out in Phamerator and see if they're orphams. (And an e-value of 1 just means that you'd expect about 1 hit this good against a database this size by random chance…meaning it is indeed a dubious result.) –Dan |
Posted in: DNA Master → BLASTing whole genome with "secure" connection
| Link to this post | posted 03 Feb, 2017 17:33 | |
|---|---|
|
|
I think Chris is right here, and you unfortunately can't add Cluster info via GenBank file, which is the only input for PhamDB. So you're left with the option of locally modifying your database and adding in the clusters. The problem there is that if you then update the database using PhamDB, and your Phamerator imports the newly-updated version, you'll probably lose those changes and have to add them again. Not ideal! –Dan |
Posted in: Phamerator → PhamDB: Make your own Phamerator databases
| Link to this post | posted 27 Jan, 2017 15:24 | |
|---|---|
|
|
mavrodi Hi Dmitri, Yes, unfortunately the systems we tested the new VM on didn't have the no-64-bit-option issue, so we didn't anticipate this level of trouble. A second option would be to revert to the 2016 SEA VM, which is fairly similar and won't need much tweaking to be brought up-to-date. If you'd like links to the 2016 version, please email me! –Dan |
| Link to this post | posted 17 Jan, 2017 20:59 | |
|---|---|
|
|
Hi Greg, You actually want Hyper-V turned OFF, not on, so I don't think it is an issue that some hardware setups don't allow it. The second step in the instructions above is usually the one that needs to be rectified, and Windows 10 Home users should still be able to do that. –Dan |
| Link to this post | posted 01 Dec, 2016 16:25 | |
|---|---|
|
|
Hi all, We switched the SEA Virtual Machine to be 64-bit this year instead of 32-bit, and one unintended side-effect is that on some Windows computers, you'll have to make one or two changes to be able to install the VM. If you'd like this in document version it's at the link below. Instructions to enable 64-bit Ubuntu in Virtual Box Now here's the fix itself… PROBLEM: After installing Virtual Box on Windows, there is no “Ubuntu (64-bit)” option in the dropdown menu, only “Ubuntu (32-bit)”. There are two steps below that should fix this and allow you to select a 64-bit option for your VM installation. The first step can be done from within Windows fairly quickly. If that doesn’t work, the second step required entering your system’s BIOS, so we recommend trying the first one, then moving on to the second only if necessary. Step 1: Change Hyper-V settings (easier fix)
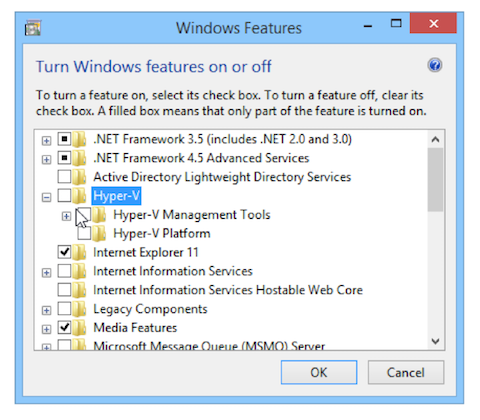
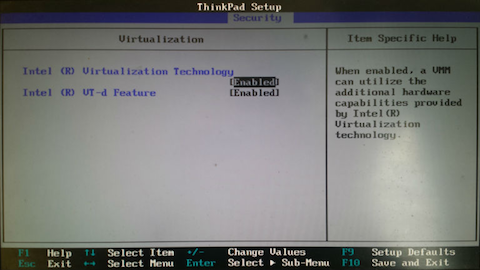
Step 2: Enable Intel virtualization (more complicated fix)
|