Welcome to the forums at seaphages.org. Please feel free to ask any questions related to the SEA-PHAGES program. Any logged-in user may post new topics and reply to existing topics. If you'd like to see a new forum created, please contact us using our form or email us at info@seaphages.org.
Recent Activity
No Ubuntu 64-bit option when installing 2017 VM on Windows
| Link to this post | posted 01 Dec, 2016 16:25 | |
|---|---|

|
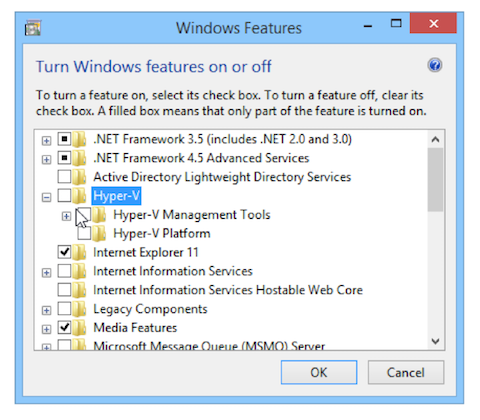
Hi all, We switched the SEA Virtual Machine to be 64-bit this year instead of 32-bit, and one unintended side-effect is that on some Windows computers, you'll have to make one or two changes to be able to install the VM. If you'd like this in document version it's at the link below. Instructions to enable 64-bit Ubuntu in Virtual Box Now here's the fix itself… PROBLEM: After installing Virtual Box on Windows, there is no “Ubuntu (64-bit)” option in the dropdown menu, only “Ubuntu (32-bit)”. There are two steps below that should fix this and allow you to select a 64-bit option for your VM installation. The first step can be done from within Windows fairly quickly. If that doesn’t work, the second step required entering your system’s BIOS, so we recommend trying the first one, then moving on to the second only if necessary. Step 1: Change Hyper-V settings (easier fix)
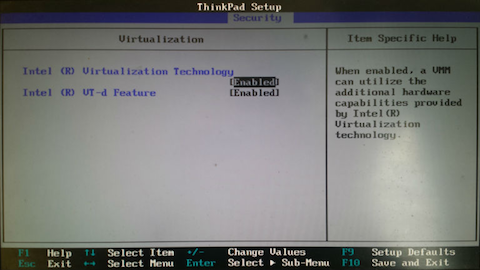
Step 2: Enable Intel virtualization (more complicated fix)
|
| Link to this post | posted 17 Jan, 2017 18:12 | |
|---|---|

|
We are running into a problem with Windows 10 Home version. The Home version of Windows 10 which is on a lot of our student computers does not have the Hyper-V option. See this link for reference: https://docs.microsoft.com/en-us/virtualization/hyper-v-on-windows/reference/hyper-v-requirements I cannot ask my students to spend the money to update their OS. QUESTION: Is there another option available? i.e. a 32bit 2017 SEA VM HELP PLEASE??? |
| Link to this post | posted 17 Jan, 2017 20:59 | |
|---|---|
|
|
Hi Greg, You actually want Hyper-V turned OFF, not on, so I don't think it is an issue that some hardware setups don't allow it. The second step in the instructions above is usually the one that needs to be rectified, and Windows 10 Home users should still be able to do that. –Dan |
| Link to this post | posted 25 Jan, 2017 00:21 | |
|---|---|

|
So, just to clarify: if Step 1 fails then the only way to install SEA VM is to start changing BIOS settings? No other options available? I currently have five students in my class that can't install the 64-bit VM. |
| Link to this post | posted 27 Jan, 2017 15:24 | |
|---|---|
|
|
mavrodi Hi Dmitri, Yes, unfortunately the systems we tested the new VM on didn't have the no-64-bit-option issue, so we didn't anticipate this level of trouble. A second option would be to revert to the 2016 SEA VM, which is fairly similar and won't need much tweaking to be brought up-to-date. If you'd like links to the 2016 version, please email me! –Dan |
| Link to this post | posted 27 Jan, 2017 15:55 | |
|---|---|
|
|
There is apparently one additional trick on some Windows 10 machines. It worked fine on my own personal PC with Windows 10. I got it working with my office PC (Win7) with no problems. But our IT guys (at a mainly engineering school where they are VERY good) could not get the Virtual Box to allow the 64bit install on the classroom computers. Two night ago, I spent about 4 hours digging to the BIOS setting on the classroom computers and on my office computer to try to make my office computer "not work" like the classroom computers so I could show IT how to make them work…. Long story short, after changing a few final BIOS settings on my office computer, I crashed my office computer and it would not even boot into the BIOS any longer. BUT THE SILVER LINING: Once IT was able to get my office computer back alive again, they said that the process helped them know what was required in the classroom computers. They said there was one additional Windows option that had to be changed that was not listed in the SEA PHAGES install document. They were able to get all 35 of the classroom PCs set to allow the Oracle VB version 5.1 to run Linux at 64bit. I need to tel them thanks this morning. I did not have time yesterday. But I will also ask them to let me know exactly what that "one last setting change" is. That may help others too! |
| Link to this post | posted 27 Jan, 2017 17:49 | |
|---|---|
|
|
FOLLOW UP FROM OUR I.T. TEAM: The particular service that was causing the issue for us on Windows 10 clients was "Device Guard." A quick way to find out if it is enabled is to run msinfo32 on the Windows 10 computer having problems: https://www.tenforums.com/tutorials/68926-device-guard-verify-if-enabled-disabled-windows-10-a.html A PowerShell script is available from Microsoft to disable this feature: https://www.microsoft.com/en-us/download/details.aspx?id=53337 I would recommend that anyone having problems consult their IT department. It may take someone who is familiar with the workings of PowerShell to initiate this script with the correct "switches." |
| Link to this post | posted 28 Mar, 2017 11:52 | |
|---|---|

|
My Phamerator ran a database update, and now it's hung up: Database Setup Required. Please enter your root database password. ? What's this? Also asked on main seahages page (before finding this forum!). Thanks, VBK |
| Link to this post | posted 28 Mar, 2017 14:29 | |
|---|---|
|
|
Hi Victoria, If Phamerator ever prompts you for a password, it should just be: "phage". If that doesn't work, something else has gone wrong! –Dan |